Your coding agents are capable of so much more—they just need an operating system. Introducing, Agent OS.
Watch the demo
A system to make AI coding agents build your way, not their way.
Agent OS transforms AI coding agents from confused interns into productive developers. With structured workflows that capture your standards, your stack, and the unique details of your codebase, Agent OS gives your agents the specs they need to ship quality code on the first try—not the fifth.
Use it with:
Claude Code, Cursor, or any other AI coding tool.
New products or established codebases.
Big features, small fixes, or anything in between.
Stop wrestling with AI that writes the wrong code. Agent OS transforms coding agents from confused assistants into trusted developers who truly understand your codebase.
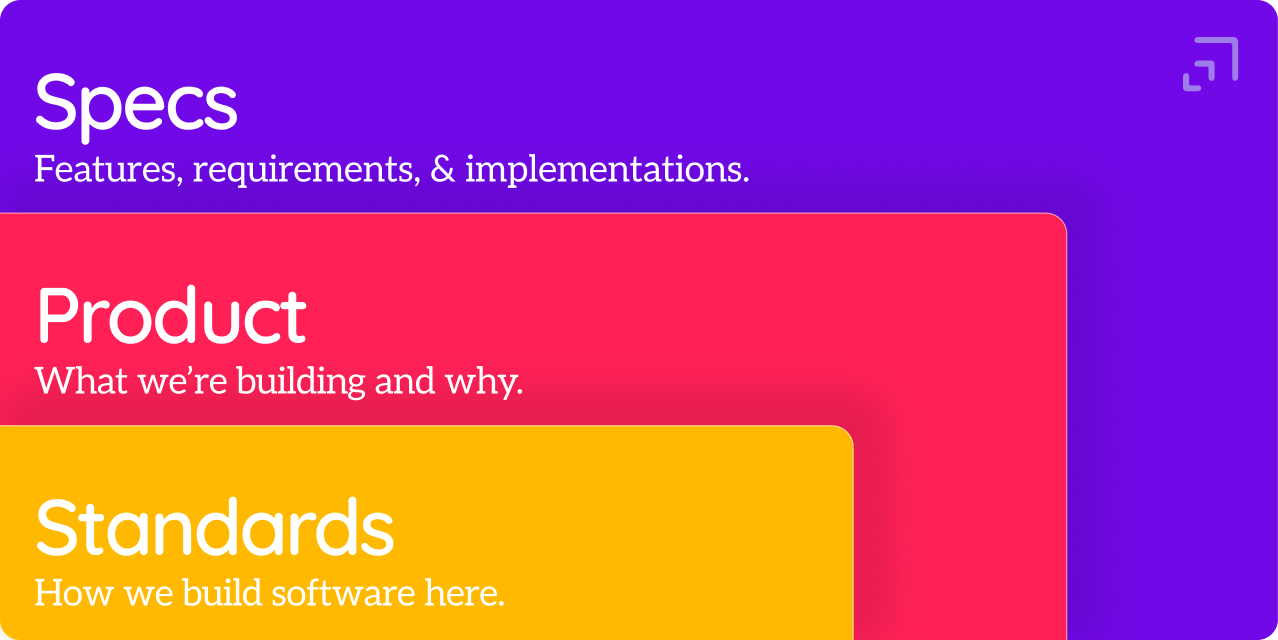
Standards - Your coding style, tech stack, and best practices
Product - Your mission, architecture, roadmap, and decisions
Specs - Detailed plans & tasks for each feature implementation
The result: Agents write code that looks like you wrote it—first time, every time.
2
Structured development, not chaos
Agent OS replaces random prompting and circular rewrites with a proven workflow. It automatically:
Writes comprehensive specs before coding begins
Breaks features into trackable, TDD-focused tasks
Documents key decisions as they happen
Updates your roadmap as features ship
The difference: Ship features faster with clear specs and completed tasks—not endless cycles of (re)explaining requirements and redoing work.
3
Your standards, your way
Agent OS is completely yours to shape. Define your own coding standards, write custom instructions, and adapt every workflow to match how your team operates. No rigid interfaces or prescribed processes—just markdown files you control. Works seamlessly with any AI tool or IDE you choose.
The relief: Your coding agent finally feels like a senior developer on your team—thinking your way, following your patterns, and shipping at your standards.
The Three Layers of Context
Agent OS works by layering context—just like you'd onboard a human developer. Each layer builds on the previous one, creating a complete picture of how you build software.
Layer 1
Your standards
Your standards define how you build software. Your stack. Your opinions. Your style. Your priorities. The standards you expect everyone on your team to follow when building anything. These should include:
Tech Stack — Your default frameworks, libraries, and tools
Code Style — Your formatting rules, naming conventions, and preferences
Best Practices — Your development philosophy (e.g., TDD, commit patterns, etc.)
Your standards documentation lives on your system in ~/.agent-os/standards/... and are referenced from every project, every codebase. Set once, use everywhere, override as needed.
Layer 2
Your product
At the product (codebase) layer, we document what it is we're building, why we're building it, who it's for, and the big-picture product roadmap. This includes:
Mission — What you're building, for whom, and why it matters
Roadmap — Features shipped, in progress, and planned
Decisions — Key architectural and technical choices (with rationale)
Product-specific stack — The exact versions and configurations for this codebase
Product documentation lives in your codebase (.agent-os/product/) and give agents the full picture of your product.
Layer 3
Your specs
Throughout your product's development, you'll create many specs. Each spec is a single feature or enhancement or fix, which typically represents a few hours or days of work (accellerated with the help of AI). Each spec will have its own requirements, technical specs, and tasks breakdown.
Individual feature specifications include:
SRD (Spec Requirements Document) — Goals for the feature, user stories, success criteria
Technical Specs — API design, database changes, UI requirements
Tasks Breakdown — Trackable step-by-step implementation plan with dependencies
Specs live in dated folders inside your codebase (.agent-os/specs/2025-12-19-user-auth/) and guide agents through each spec's implementations.
With all three layers in place, your agent has everything it needs: how you build (Standards), what you're building (Product), and what to build next (Specs). No more confusion, no more rewrites—just clean, consistent code that looks like you wrote it.
Install Agent OS
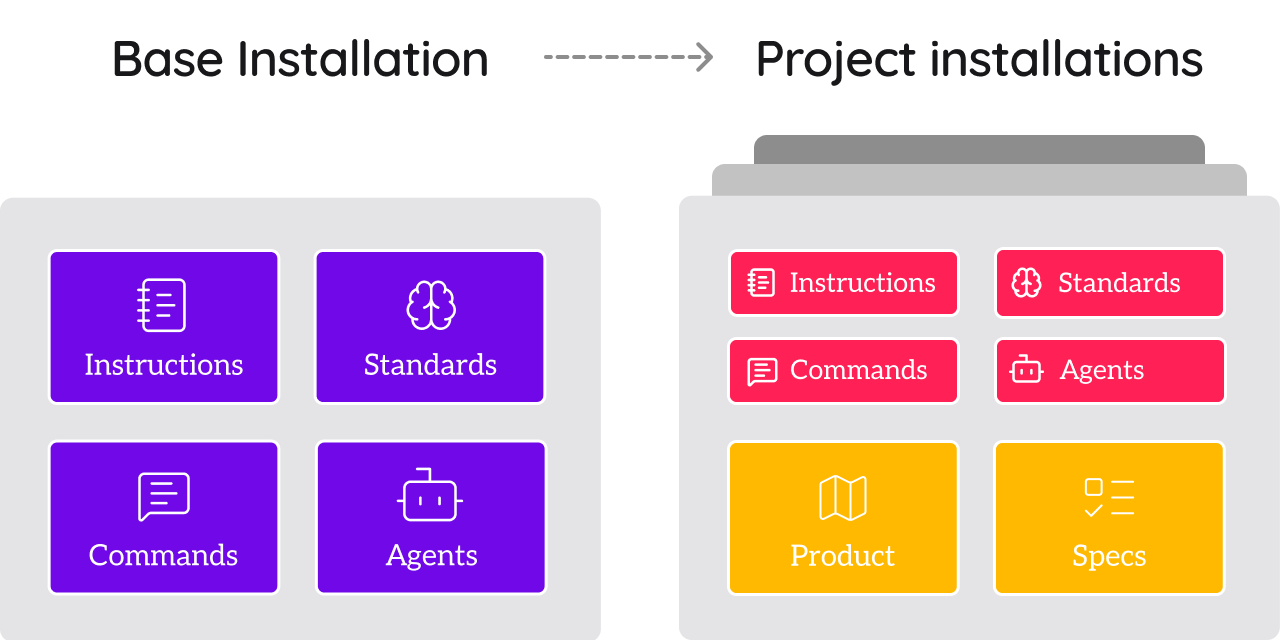
Agent OS has a flexible two-part installation system:
Base Installation
Install Agent OS centrally on your system Optional but recommended - maintains your standards and instructions
Project Installation
Install Agent OS into each project you work on Self-contained setup with project-specific customizations
The base installation sets up Agent OS centrally on your system. This is optional but recommended, as it maintains your default standards and instructions that projects will inherit from.
Navigate to your home folder (or other location)
The recommendation location for your base installation is your system's home directory (~/.agent-os).
However, you can choose another location for your base installation.
Choose your installation based on which tools you use:
Upgrading from an earlier version? Follow these steps:
Back up customizations: If you've customized files in /instructions, back them up now.
Run the base installation update:
Copy
Copied!
# Navigate to your home directory (or wherever you want the base installation)
cd ~

# Run with flags for your tools (adjust as needed):
curl -sSL https://raw.githubusercontent.com/buildermethods/agent-os/main/setup/base.sh | bash -s -- --overwrite-instructions --claude-code --cursor
Clean up old Claude Code commands: If you have Agent OS commands in ~/.claude/commands, remove them.
Install into your projects: Navigate to each project and run your project installation command (this example assumes your base installation resides in your home folder):
Copy
Copied!
~/.agent-os/setup/project.sh
As Agent OS evolves, you may want to update your instruction files while preserving your custom standards. Use these flags with the install script:
Update Instruction Files Only
This updates the instruction files to the latest versions while preserving your standards:
Best Practice: Before updating standards files, back up your customizations so you can restore them after the update.
Important
Customize your base standards
After installation, customize the standards files in ~/.agent-os/standards/ to match your preferences. These will be your defaults for all projects.
The installed files are templates - customize them to define your way of building software. Projects will copy these standards, which you can then customize per-project if needed.
After base installation is complete, you'll see your project installation command. Save this command - you'll use it to install Agent OS into each of your projects.
2
Project Installation
Each project gets its own self-contained Agent OS installation. This copies files from your base installation (if you have one) and sets up tool-specific commands.
If you have a base installation:
Navigate to your project's root directory and run your project installation command:
Copy
Copied!
# If your base installation is in your home directory:
~/.agent-os/setup/project.sh

# If installed elsewhere:
/path/to/agent-os/setup/project.sh
Your exact command was shown after base installation
Without a base installation:
You can install Agent OS directly into a project from GitHub:
Project Installation (self-contained in each project):
Copy
Copied!
your-project/
├── .agent-os/                    # Project's own Agent OS installation
│   ├── instructions/             # Copied from base (or defaults)
│   │   └── [same structure as base]
│   ├── standards/                # Copied from base (or project type)
│   │   └── [same structure as base]
│   ├── product/                  # Created by plan-product command
│   ├── recaps/                   # Created by execute-tasks command
│   └── specs/                    # Created by create-spec command
├── .claude/                      # If using Claude Code
│   ├── commands/                 # Agent OS commands
│   │   └── [command-files].md
│   └── agents/                   # Agent files
│       └── [agent-files].md
└── .cursor/                      # If using Cursor
    └── rules/
        └── [command-files].mdc
Key difference in version 1.4+ from earlier versions: Each project is now self-contained with its own copy of instructions and standards. No more external references means more reliable performance and better team collaboration.
Using Agent OS
With Agent OS installed, you're ready to supercharge your AI coding workflow.
At a high level, there are 3 phases that come into play when you're building with Agent OS:
1
Define your standards
Using your base installation of Agent OS, you should customize your coding standards, style, best practices, and common tech stacks used on your projects.
After installing Agent OS in a project, use /plan-product (for a new product) or /analyze-product (for an existing codebase) to define the project's mission and roadmap.
The main benefit of installing the base installation of Agent OS#base-installation, onto your system is it allows you to define your commonly used coding standards and best practices in one place. Then every time you run your project installer for Agent OS, it will copy those into your project (where you can customize them further, if you want).
This is how your coding agent follows your best practices and coding style with every single task it executes.
Edit your tech stack
~/.agent-os/standards/tech-stack.md
Set your preferred frameworks and versions
Define default database choices
Specify hosting preferences
Etc...
Edit your code style
~/.agent-os/standards/code-style.md
Indentation preferences (spaces vs tabs, how many)
Naming conventions (camelCase vs snake_case)
File organization patterns
Etc...
Edit your best practices
~/.agent-os/standards/best-practices.md
Testing philosophy (TDD? Integration first?)
Performance vs readability trade-offs
Security considerations
Etc...
💡 Pro tip: Be opinionated! The more specific your standards, the more consistent your agent's output.
When beginning a new product, you can provide as much or as little detail as you want—though more detail leads to better results by using the /plan-product command.
Installing Agent OS into an existing product that's midway through development? You'll want to use the /analyze-product command instead of the /plan-product command.
Copy
Copied!
/plan-product

I want to build a SaaS tool for tracking customer feedback
Key features: feedback collection, sentiment analysis, reporting dashboard
Target users: Product managers at B2B SaaS companies
Tech stack: Use my defaults
Note: When starting a new product, feel free to provide as much or as little detail in your initial prompt. You can even invoke the /plan-product command with no other details and your agent will then prompt you for the specific details it needs to get started on your product's plan and roadmap.
Once your agent has collected the basic details it needs, it will:
✅ Create .agent-os/product/ structure
✅ Generate mission.md with product vision
✅ Create a 5-phase roadmap
✅ Set up your preferred tech stack
Important: Review and edit the generated documentation to ensure it accurately reflects your vision and goals.
Adding Agent OS to Existing Products
Have an existing codebase? No problem. Use the /analyze-product command (instead of /plan-product) to install Agent OS into your existing codebase.
Copy
Copied!
/analyze-product

I want to install Agent OS in my existing codebase
Your agent will:
🔍 Analyze your current code structure
📊 Detect your tech stack and patterns
📝 Create documentation reflecting what's already built
✅ Add completed features to "Phase 0" in the roadmap
Important: Review the generated documentation carefully—your agent's analysis might miss nuances or business context that only you know.
Plan & build a feature
Feature development with Agent OS involves a sequence of these commands:
/create-spec - Create the detailed spec for this feature.
/create-tasks - Create a tasks list based on the feature spec.
/execute-tasks - Proceed with implementation of 1 or several tasks.
Let's break down each step:
Create a spec
Copy
Copied!
/create-spec

Let's add user authentication with email/password and OAuth
This will kick off the spec creation process, where your agent will:
📋 Create a Spec Requirements Document (SRD)
🔧 Write technical specifications
💾 Design database schemas (if needed)
🔌 Document API endpoints (if needed)
Important: This is the most critical review point! Carefully examine the SRD, specs, and especially the task breakdown. Adjust anything that doesn't match your expectations before proceeding.
Specs live in: .agent-os/specs/2025-07-16-user-authentication/
Everything look good? You're ready to proceed to creating the tasks for this spec...
Create a tasks list
Copy
Copied!
/create-tasks

Please create tasks for this spec
Your agent will:
Create a tasks.md file in your spec folder for this feature.
Create a numbered checklist with parent tasks and sub-tasks
Follow a TDD (test-driven-development) approach when designing the task list and execution order.
Again: Give this tasks list a close review to ensure all the steps follow your spec, are in a logical order and everything looks as you'd expect.
Ready to go? Proceed with the /execute-tasks command and specify which task(s) you want your agent to build.
Execute tasks (start coding!)
Copy
Copied!
/execute-tasks

Please execute all of the tasks for this spec
Your agent will proceed with
Implement every task, in order
Delegate to subagents for some steps (if using Claude Code)
Write and run tests
Mark tasks as completed
Update your product's roadmap if milestones have been completed
Document a recap of what was done and store this in .agent-os/recaps
Commit to git
Note: Under the hood, the /execute-tasks actually runs a series of several sub-processes (which you can inspect in your /instructions folder):
/execute-tasks - The main process you called
/execute-task - Runs this on a loop for the implementation of each individual task (and it's sub-tasks).
/post-execution-tasks - Finalizing, commiting to git, updating task list and roadmap, documenting the recap, delivering the final report to you.
Refining Your Agent OS
Agent OS gets better with use. Each spec teaches you something about your process, your preferences, and how to better guide your AI agents. Here's how to continuously improve your setup.
The Refinement Loop
After each feature or spec, ask yourself:
What worked well?
Patterns to document and repeat
What needed correction?
Gaps in your standards or instructions
What surprised you?
Unexpected approaches that might be worth adopting
Common Refinements
After Your First Project
Add specific examples to code-style.md based on actual code
Update best-practices.md with patterns you had to correct
Clarify any tech stack choices that caused confusion
After Code Reviews
Notice yourself making the same corrections? Add them to standards
Find a pattern you love? Document it so agents use it consistently
Spot anti-patterns? Add them to best-practices.md with clear "don't do this" examples
After Team Feedback
Incorporate team preferences into your standards
Add team-specific workflows to best-practices.md
Document naming conventions everyone agrees on
Where to Make Updates
Standards Files
tech-stack.md - New tool preferences, version updates
Reference them conditionally in your main code-style.md file
This keeps context lean—agents only load styles relevant to current work
Remember: Your standards can (and should) live in both your base installation of Agent OS (typically in your system's home directory) and in your project's .agent-os/standards/ folder. The version in your base installation are the templates used when installing Agent OS into new projects. Any changes you make to your base installation will not automatically be used in your projects. You'd need to copy those updates into your project's standards files.
Product Files (Product-specific)
roadmap.md - Adjust phases based on learnings
tech-stack.md - Override global standards when needed
Making Refinements Stick
Be Specific
❌ "Write better tests"
✅ "Write integration tests first, then unit tests. Mock external services using [specific pattern]"
Show, Don't Just Tell
Include code examples in your standards
Show both good and bad patterns
Explain why one approach is preferred
Version Your Changes
Update version numbers when making significant changes
Keep a brief changelog at the bottom of modified files
This helps track what changed and when
Team Refinement
If working with a team:
Schedule Regular Reviews
Monthly or after major features
Collect Patterns
What is everyone correcting in code reviews?
Reach Consensus
Agree on patterns before adding to standards
Share Updates
Ensure everyone updates their local Agent OS files
Signs You Need Refinement
You're making the same corrections repeatedly
Agents consistently miss certain patterns
Code reviews reveal style inconsistencies
New team members point out unclear conventions
You discover better patterns worth standardizing
The Long Game
Remember: Agent OS is a living system. The goal isn't perfection on day one—it's continuous improvement. Each refinement makes your agents more effective and your codebase more consistent.
Your Agent OS a year from now will be dramatically better than today's, shaped by real experience and tailored to exactly how you and your team work best.
Best Practices
While Agent OS's task execution process automatically updates your roadmap and prompts for decision updates, it's good practice to regularly:
Review and refine your standards
As you see patterns in code reviews, update your standards files
Regularly review roadmap.md
Ensure it reflects actual progress and priorities
Update decisions.md
Document important choices that affect future development
Refine best-practices.md
Add patterns that help your agent think like you think
Regular maintenance keeps your Agent OS aligned with your evolving project and team needs.
Tips for Success
Review Plans Carefully
The planning phase is crucial—invest time here to save time later
Review the PRD and task breakdown before execution
Ask your agent to adjust plans if something doesn't look right
Ensure you're aligned on the approach before coding begins
Start Small
Don't try to document everything at once
Begin with basic standards, refine as you go
Be Specific
"Use PostgreSQL" → "Use PostgreSQL 15+ with schemas for multi-tenancy"
"Write tests" → "Write unit tests first, aim for 80% coverage"
Trust the Process
Let your agent own entire features, not just snippets
Review and refine rather than micromanage
Know When to Start Fresh
Not happy with the implementation? It's often better to revert and redo with better planning
Don't ask your agent to fix incorrectly implemented code—start clean with refined specs
A clear redo usually beats incremental fixes
Troubleshooting
Agent not following your style?
Check your standards files are specific enough
Add examples to code-style.md
Update best-practices.md with clear dos and don'ts
Tasks too big or too small?
This is a planning issue—catch it early!
During create-spec, review the task breakdown carefully
Ask your agent to adjust: "Can you break task 3 into smaller sub-tasks?"
Or: "Tasks 2 and 3 should be combined"
Wrong technical approach?
Review technical specs during the planning phase
Don't wait until code is written to course-correct
Say: "I'd prefer we use [different approach] for this"
Update tech-stack.md, decisions.md, or best-practices.md to prevent future issues
Best-practices.md is especially important—it teaches your agent to think like you
Remember: The best time to fix issues is during planning, not after code is written!
FAQ
What is Agent OS?
Agent OS is a system for better planning and executing software development tasks with your AI agents. It consists of a set of finely tuned instructions, commands, and specs that you and your team can dial in to ensure your agents build the right things, the right way—your way.
Spec-driven development is a software development methodology that emphasizes the use of specifications to guide the development process—particularly in the age of building with AI coding agents.
It is a way to ensure that the software is built the right way—your way.
Is Agent OS free?
Agent OS is free and open source and released under the MIT license.
Who created Agent OS?
Agent OS is free and open source, created by Brian Casel (that's me!).
I'm the creator of Builder Methods, where I teach fellow software designers and developers how to leverage AI to build better products, faster. Get my free Builder Briefing newsletter to get my latest insights and updates to help you grow as a professional in the age of building with AI.
Builder Methods, is where I (Brian Casel) teach fellow software designers and developers how to leverage AI to build better products, faster. Get my free Builder Briefing newsletter to get my latest insights and updates to help you grow as a professional in the age of building with AI.
How does Agent OS manage context efficiently?
Agent OS uses smart context management to optimize your agent's performance:
Conditional Loading: Files are only loaded when needed for the current task
Lite Files: Condensed versions of mission and spec documents for efficient AI context usage
Context-Aware Instructions: Standards only load relevant sections based on what you're building
60-80% Context Reduction: Compared to loading everything upfront
This means faster responses, better focus on the task at hand, and the ability to work with larger codebases without hitting context limits.
Does Agent OS support Claude Code's specialized agents?
Yes! If you're using Claude Code, Agent OS automatically detects and uses specialized subagents for better performance:
git-workflow: Handles branches, commits, and pull requests
file-creator: Creates multiple files and directories in batch
These agents work seamlessly with Agent OS instructions, providing faster and more reliable execution while maintaining full compatibility for users of other AI tools.
I don't use Claude Code or Cursor. Can I still use Agent OS?
Absolutely!
Agent OS can be installed and adapted no matter which AI coding tool(s) you use. See the section on installing Agent OS in your tools for more details.
Is support or coaching available for me or my team?
Yes — Coaching and courses for teams and individuals looking to get the most out of Agent OS, taught by me, Brian Casel (the creator of Agent OS).
My best free training and resources are available through my Builder Briefing newsletter. You can also subscribe to my YouTube channel where I regularly release build-with-AI tutorials.
Training for pro software developers building with AI.
Created by Brian Casel (that's me). I'm a career software developer, founder, and creator of Builder Methods and the Agent OS system for building with AI.